

Seleum Grid is great and it's a breeze to get it started up locally, where things get a bit heavier is when you actually want to deploy it for real instead of just on your local machine.
Table of Contents
Why Fargate?
There are a few ways to get this setup on AWS, my initial attempt was to simply setup a small cluster of EC2 nodes, and deploy the compose file that Selenium provides
This worked, but there were problems:
- It requires manually managing EC2 instances and the cluster itself.
- Docker Swarm doesn't really "do" orchestration, so it's easy to end up with a bunch of containers shoved onto a single instance while your un-occupied instances sit around looking bored (and costing money).
Fargate sounded attactive because not only would it handle orchestration, but managing the instances as well. This meant it would be easier to scale horizontally or vertically. The catch is that like most AWS services, it requires doing things the "AWS Way". Really this just boiled down to mapping some of Fargate's terminology to concepts that were more familiar to me coming from Docker Swarm.
- Task Definitions can be thought of similar to service definitions in a
docker-composefile, they define the image, resources, ports, volumes, etc. - Service Definitions outline you AWS-specific info like security groups, execution roles, and networking. These deploy your task definition to the cluster.
Setup
Before we get started we'll need to setup some permissions and roles to allow our cluster's containers to do their thing.
Create Roles
Open the IAM Role dashboard, and create two roles: one for the ECS service, and one for ECS tasks. Make sure to add the AmazonECSTaskExecutionRolePolicy permission to the task's role.
Configure the VPC
First and most importantly if you don't want to pull out a lot of hair: in order for ECS to be able to pull container images, you'll need to either configure a private subnet within your VPC or assign public IP addresses to the services running in the cluster. Since Selenium Grid has no authentication mechanism built in (unless you feel like tooling around, then theoretically this means anyone with the hub IP could use your cluster to run jobs. Not cool. The optimal setup is deploying on a private subnet, then jumping on a VPN to access it.
Next, you'll need to setup a private DNS namespace so that containers can communicate with eachother by hostname. This is pretty simple to do from the CLI. If you prefer the GUI, you can also set this up using the AWS Cloud Map tool. If you have an existing namespace, feel free to skip this step and use that instead.
For the purposes of this guide we'll assume the namespace is local.
aws servicediscovery create-private-dns-namespace --name local --vpc <VPC ARN>
Create an ECS cluster
First we need to create our cluster so we can assign "tasks" to it.
aws ecs create-cluster --cluster-name selenium-grid
You should see some output like:
{
    "cluster": {
        "clusterArn": "arn:aws:ecs:us-east-1:438384420157:cluster/selenium-grid",
        "clusterName": "selenium-grid",
        "status": "ACTIVE",
        "registeredContainerInstancesCount": 0,
        "runningTasksCount": 0,
        "pendingTasksCount": 0,
        "activeServicesCount": 0,
        "statistics": [],
        "tags": [],
        "settings": [
            {
                "name": "containerInsights",
                "value": "disabled"
            }
        ]
    }
}
Registering tasks
There are actually two ways to define tasks: you can either use the approach I took here and piece together some JSON files for each of your tasks and services, or you can actually use docker-compose.yml and the aws ecs-cli compose (command)[https://docs.aws.amazon.com/AmazonECS/latest/developerguide/cmd-ecs-cli-compose.html] -- but be aware that there's a caveat (it's AWS -- there's always a caveat):
AWS treats the entire compose file as a single task, with all the services within it sharing a fixed amount of resources.
This is useful for some situations, but in this case we actually want our hub and browser containers to have their own dedicated resources, so instead what we'll do is define a task for each service. This lets us easily scale things horizontally or vertically.
Hub task
This is where the docker-compose.yml helps out. We might not want to use it directly, but we can reference it to figure out how to define our containers. For example our hub task from our compose file is pretty simple:
hub:
  image: selenium/hub:3.141.59-uranium
  ports:
    - '4444:4444'
Beyond pulling the image we just need to open up port 4444. Additionally we'll need to define some AWS-specific info like task/execution roles, security groups, and networking.
{
    "family": "selenium-grid-hub",
    "networkMode": "awsvpc",
    "taskRoleArn": "<TASK ROLE ARN>",
    "executionRoleArn": "<EXECUTION ROLE ARN>",
    "containerDefinitions": [
        {
            "name": "hub",
            "image": "selenium/hub@3.141",
            "portMappings": [
                {
                "hostPort": 4444,
                "protocol": "tcp",
                "containerPort": 4444
                }
            ],
            "essential": true,
            "entryPoint": [],
            "command": []
        }
    ],
    "requiresCompatibilities": [
        "FARGATE"
    ],
    "cpu": "1024",
    "memory": "2048"
}
Register the Hub task with the command:
aws ecs register-task-definition --cli-input-json file://hub-task.json
Chrome Task
Similarly when we examine the docker-compose definition for the chrome worker:
chrome:
  image: selenium/node-chrome:3.141.59-uranium
  volumes:
    - /dev/shm:/dev/shm
  depends_on:
    - selenium-hub
  environment:
    - HUB_HOST=selenium-hub
    - HUB_PORT=4444
This one is a little more interesting: we need to mount a volume (/shm is the system's shared memory. Forunately it's not difficult to map this to an EBS. We just need to define a mountPoint that /dev/shm will be mounted to.
Another significant detail that's easy to overlook when converting from Docker Compose to AWS is how we reference other containers. Using Compose we can just reference the service name, but with Fargate we need to reference its Service Discovery hostname.
This means if your namespace is local and your service name is hub then the Chrome service would refer to it as hub.local.
It's a tiny detail, but not setting this correctly will result in everything appearing to work fine, except you won't see any browser instances available to Selenium!
Putting this all together we end up with a service definition like so:
{
    "family": "selenium-grid-worker-chrome",
    "networkMode": "awsvpc",
    "taskRoleArn": "<TASK ROLE ARN>",
    "executionRoleArn": "<EXECUTION ROLE ARN>",
    "containerDefinitions": [
        {
            "name": "hub",
            "image": "selenium/node-chrome:latest",
            "portMappings": [
                {
                    "hostPort": 5555,
                    "protocol": "tcp",
                    "containerPort": 5555
                }
            ],
            "essential": true,
            "entryPoint": [],
            "command": []
        }
    ],
    "environment": [
        {
          "name": "HUB_HOST",
          "value": "hub.local"
        },
        {
          "name": "HUB_PORT",
          "value": "4444"
        }
    ],
    "mountPoints": [
        {
          "readOnly": null,
          "containerPath": "/dev/shm",
          "sourceVolume": "worker_chrome_scratch"
        }
    ],
    "volumes": [
        {
          "name": "worker_chrome_scratch",
          "host": {}
        }
    ],
    "requiresCompatibilities": [
        "FARGATE"
    ],
    "cpu": "2048",
    "memory": "4096",
}
Create the task definition, referencing the file we just created:
aws ecs register-task-definition --cli-input-json file://chrome-task.json
Create Services
Services take our task definition and describe how it should be deployed within the cluster. For our purposes we're keeping things simple, so we just need to define a few standard AWS parameters, and set a desiredCount telling ECS how many instances of the task should be created for this service.
The most important thing here is the serviceRegistry setting. Without this enabled, tasks can't communicate with eachother.
Hub service
{
    "cluster": "selenium-grid",
    "deploymentController": {
       "type": "ECS"
    },
    "desiredCount": 1,
    "launchType": "FARGATE",
    "networkConfiguration": {
       "awsvpcConfiguration": {
          "assignPublicIp": "DISABLED",
          "securityGroups": ["<SECURITY GROUP ARN>"],
          "subnets": ["<SUBNET ARN>"]
       }
    },
    "platformVersion": "LATEST",
    "schedulingStrategy": "REPLICA",
    "serviceName": "hub",
    "taskDefinition": "selenium-grid-hub",
    "serviceRegistries": [
      {
        "registryArn": "<NAMESPACE ARN>",
        "containerName": "hub"
      }
    ]
}
This just tells Fargate to run at minimum one instance of the hub, and defines its security and subnet settings. Deploy with:
aws ecs create-service \
    --cli-input-json file://./hub-service.json
Worker service (Chrome)
Note: The process for FireFox is exactly the same, so for brevity we'll just focus on Chrome.
Next we create a Chrome browser task, which is similar to the hub task except for its naming:
{
    "cluster": "selenium-grid",
    "deploymentController": {
       "type": "ECS"
    },
    "desiredCount": 1,
    "launchType": "FARGATE",
    "networkConfiguration": {
       "awsvpcConfiguration": {
          "assignPublicIp": "DISABLED",
          "securityGroups": ["<SECURITY GROUP ARN>"],
          "subnets": ["<SUBNET ARN>"]
       }
    },
    "platformVersion": "LATEST",
    "schedulingStrategy": "REPLICA",
    "serviceName": "chrome",
    "taskDefinition": "selenium-grid-worker-chrome",
    "serviceRegistries": [
      {
        "registryArn": "<NAMESPACE ARN>",
        "containerName": "chrome"
      }
    ]
 }
Same as before, we'll create this service within our cluster:
aws ecs create-service \
    --cli-input-json file://./chrome-service.json
Wrapping Up
Now if we log into the AWS ECS dashboard and open up our cluster, we should see two running services:
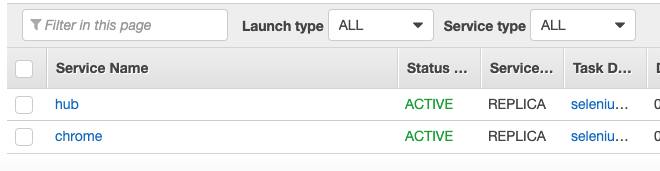
Next we want to confirm the hub is running and our Chrome instances have been added. Normally you'd setup a load balancer and access the hub that way, but since we didn't set one up for the sake of simplicity, we'll just use the hub's private IP (or public if you went that route).
Click the 'hub' task, then the 'Task' tab, and select our Hub task's ID:
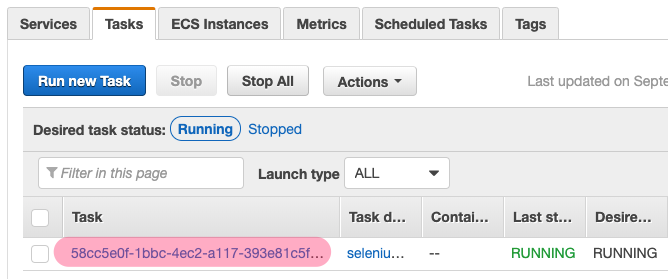
Scroll down and find the public or private IP of the hub.
Using the IP of the hub, if we go to http://:4444/grid/console we should see that our instances are connected:

Congragulations, you now have a scalable Selenium Grid!
Further Topics
There's a lot you can do at this point depending on your needs.
Scaling a Selenium Grid cluster is a whole topic of its own. The complexity arises from the nature of the workload. A browser instance's CPU and RAM might spike a little when it's loading a page, but will drop quickly afterwards. This is much different than a server application that might gradually consume more resources as it handles more connection.
What this means is we can't really use Amazon's Auto-Scaling features, because CPU/RAM metrics won't really tell us when we need to scale up/down.